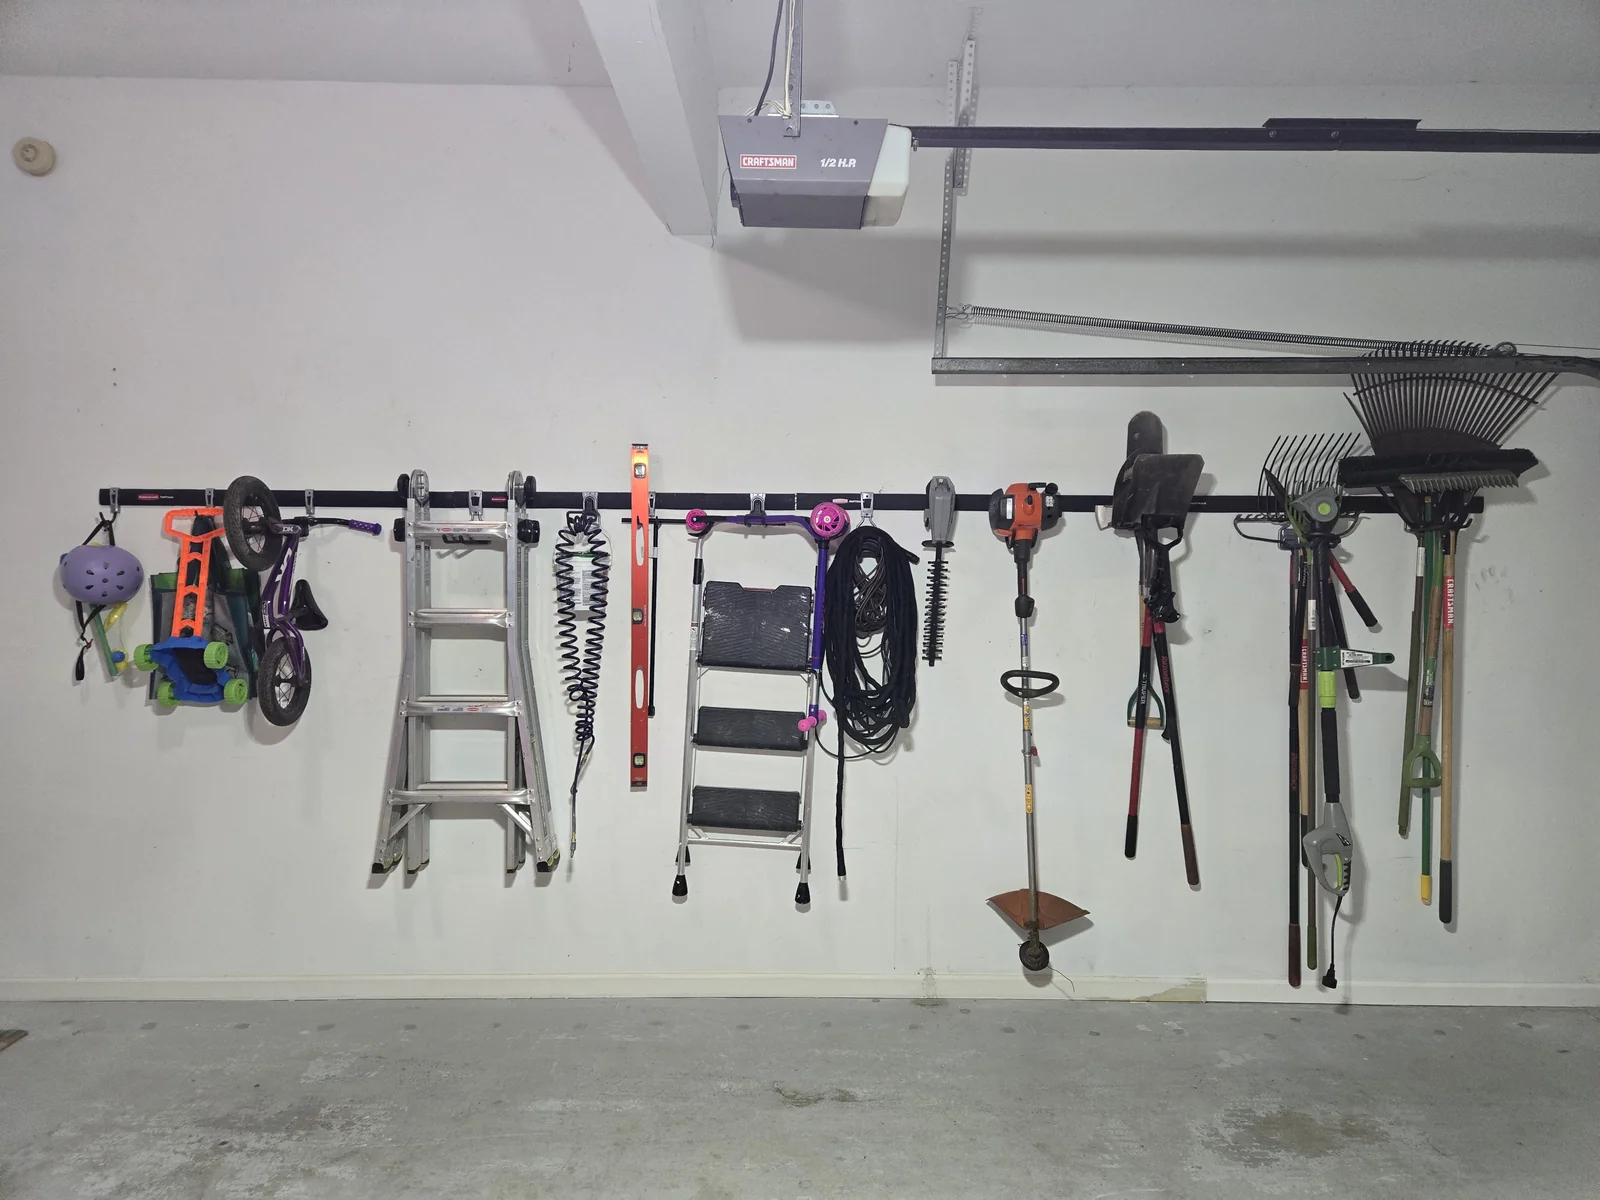
The Rubbermaid FastTrack is the only garage wall storage system I’ve actually stuck with. I installed it 7 years ago in my first house, took it down when we moved, and reinstalled it in our current garage. Both installs went up in an afternoon. Both are still holding everything I throw at them — ladders, extension cords, lawn tools, bikes, and seasonal gear.
This guide walks through the install I just finished in our current garage. The pictures are the actual rail and the actual screws holding it up. Here’s exactly how to do it without the trial-and-error that slowed me down on my first install.
Quick answer: Use #9 x 2-1/2” construction screws (not lag bolts — they’re too thick for the rail holes), drive one into every stud the rail crosses, and use a self-leveling laser instead of trying to mark a level line by hand on an 84-inch span. Top of rail at 72-80 inches off the ground works for most garages.
Why I Use Construction Screws Instead of Lag Bolts
Lag bolts are the strongest fastener you can drive into a stud. For TV mounts and pull-up bars, I use 3/8” lag bolts and they’re rock solid. But the FastTrack rail’s mounting holes are too small for 3/8” lag bolts. The hole diameter is sized for #9 or #10 wood screws — anything thicker won’t fit through.
That confused me on my first install. I bought a kit of lag bolts and washers, then realized the bolt heads were too wide and the shafts wouldn’t pass through the rail. Construction screws are the answer:
- Diameter that fits the FastTrack hole
- Length long enough to bite 1.5+ inches into the stud (I use 2-1/2”)
- Holding power in the same league as lag bolts when driven into a stud
- Star drive head that doesn’t strip out under high torque
The single-rail load rating of 1,750 pounds is for a properly screwed install. You’re not losing capacity by choosing construction screws over lag bolts — the limit is the rail and the studs, not the fastener.
What You’ll Need
Tools:
- Cordless drill or impact driver
- Stud finder — non-negotiable, you cannot eyeball studs
- Self-leveling laser and tripod (or a 4-foot manual level if you don’t have a laser)
- Tape measure
- Pencil
- T-25 star drive bit (most drill bit sets have one)
Hardware:
- Rubbermaid FastTrack 84-inch rail — buy one rail per 84 inches of wall you want to cover. I have four side by side.
- Grip-Rite #9 x 2-1/2” construction screws — one box covers multiple rails. Lag bolts won’t fit.
- FastTrack hooks and accessories — start with a few utility hooks and add as you figure out what to hang.
Step-by-Step Install
Step 1: Plan the Layout
Before you mark anything, figure out where the rail goes and how high. I run the rail along the long wall of the garage, with the top of the rail at roughly 76 inches off the ground. That’s high enough that nothing I store hangs into head-bumping range, but low enough that I can reach the top of the rail without a step stool.
Two things to consider:
- Garage door clearance. If your garage door tracks intrude into the wall area, plan your rail to stop short of them. The rail doesn’t have to span the whole wall.
- Outlets, light switches, and pipes. Walk the wall before drilling. Anything in the way needs to be worked around or you need to shift the rail.
Step 2: Find Every Stud the Rail Crosses
An 84-inch rail at standard 16-inch stud spacing crosses 5 studs. Walk the stud finder along the wall at the height where the rail will sit, mark the center of each stud, and double-check by sliding the stud finder back and forth across the same spot. False positives near electrical wiring are common — confirm by checking 4-6 inches above and below.
I mark each stud with a vertical pencil line that’s about 6 inches long. That way I can see the stud center even after I’m holding the rail up.
Step 3: Set Up the Laser Level
This is the step that separates a clean install from a crooked one. An 84-inch rail magnifies any tilt error — even half a degree off looks obviously wrong once tools are hanging.
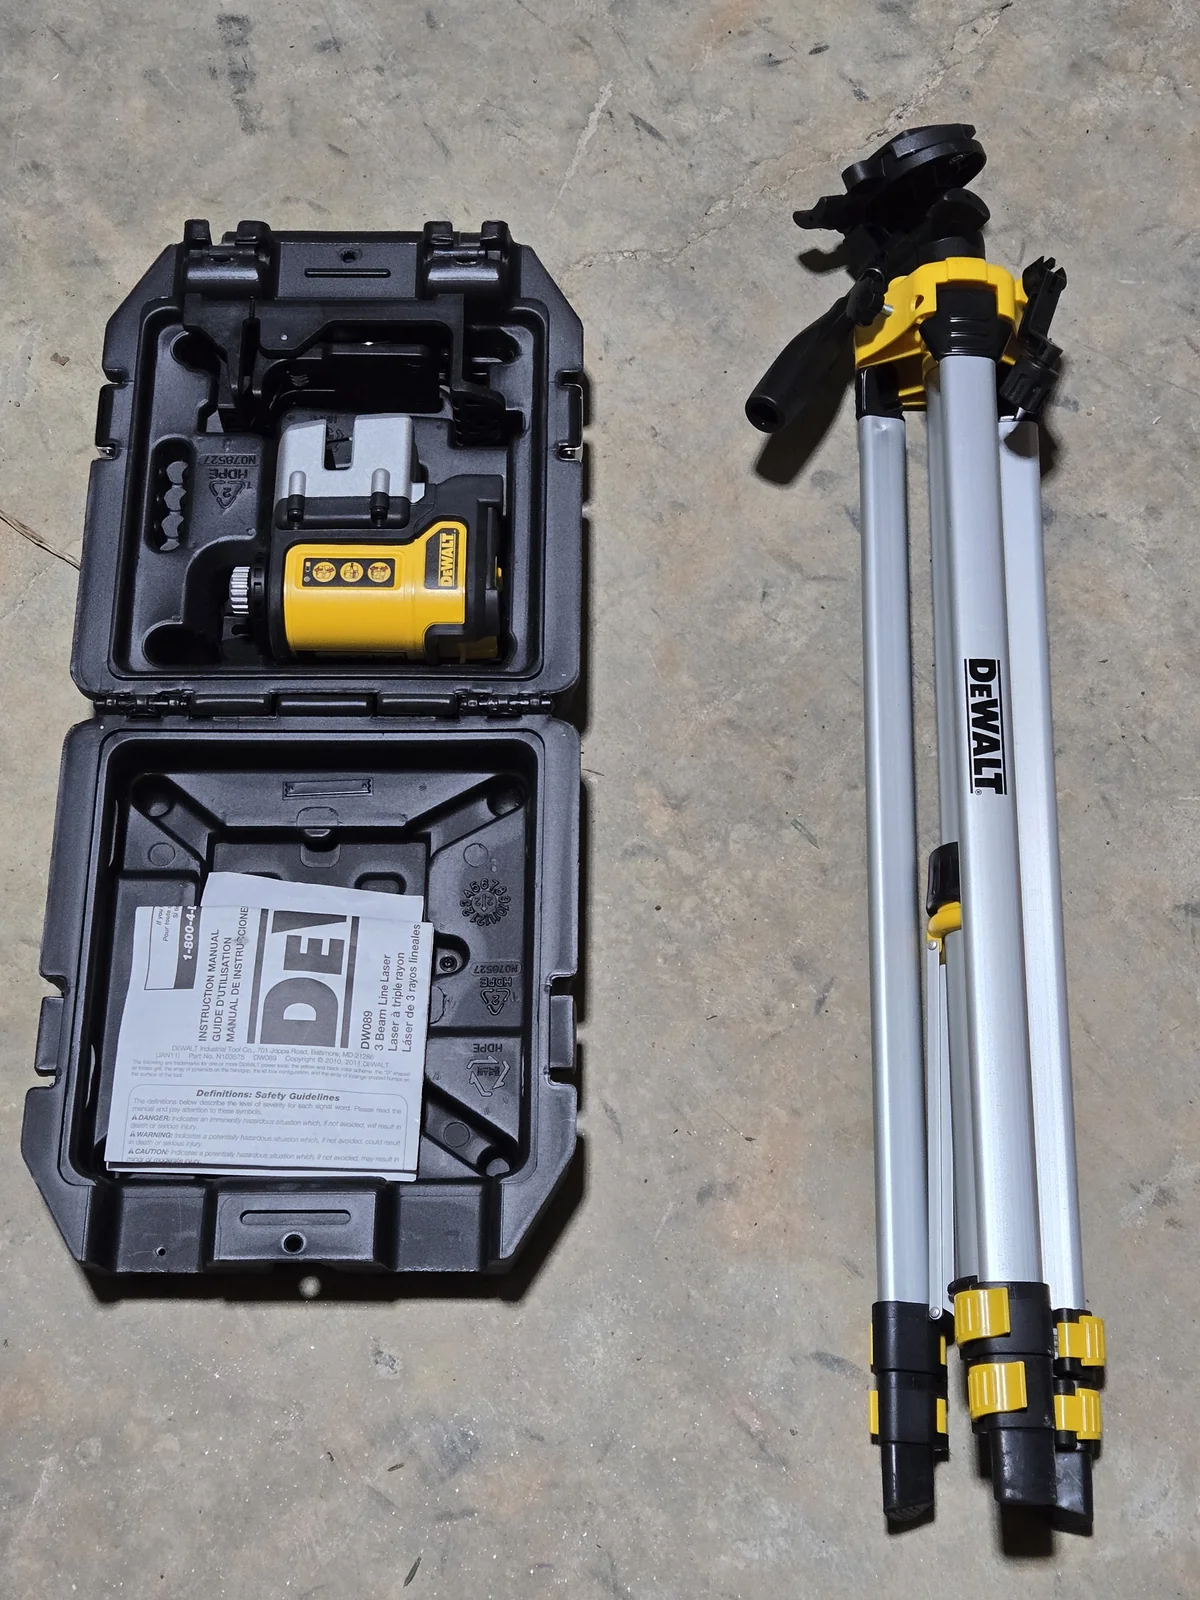
Set up the DEWALT 3-way laser on its tripod about 6-8 feet from the wall, at the height where you want the top of the rail. Turn it on, let it self-level (takes about 2 seconds), and you’ll have a perfectly horizontal green line projected across the wall.
I use the green DEWALT specifically because the green beam is way easier to see in a lit garage than red lasers. If you don’t have a laser, a 4-foot manual level works — just check it twice on a long rail to make sure the bubble’s centered both ways.
Step 4: Mark the Top Edge of the Rail
With the laser line projected, mark a small pencil tick at each stud where the laser line crosses your stud marks. These ticks are where the top edge of the rail will sit.
Step 5: Hold the Rail Up and Mark the First Hole
Hold the rail against the wall with the top edge aligned to your pencil ticks. Find the FastTrack mounting hole that lines up with your leftmost stud and mark through it onto the wall with a pencil.
This is where having a helper is nice but not required. If you’re solo, lightly drive a single screw into one stud through one rail hole to hold the rail up while you align the rest. You can pull it out and reposition if needed.
Step 6: Drive Screws Into Every Stud
Once the rail is held up by one screw and looks aligned to your laser line, drive a #9 x 2-1/2” construction screw through every FastTrack hole that lines up with a stud.
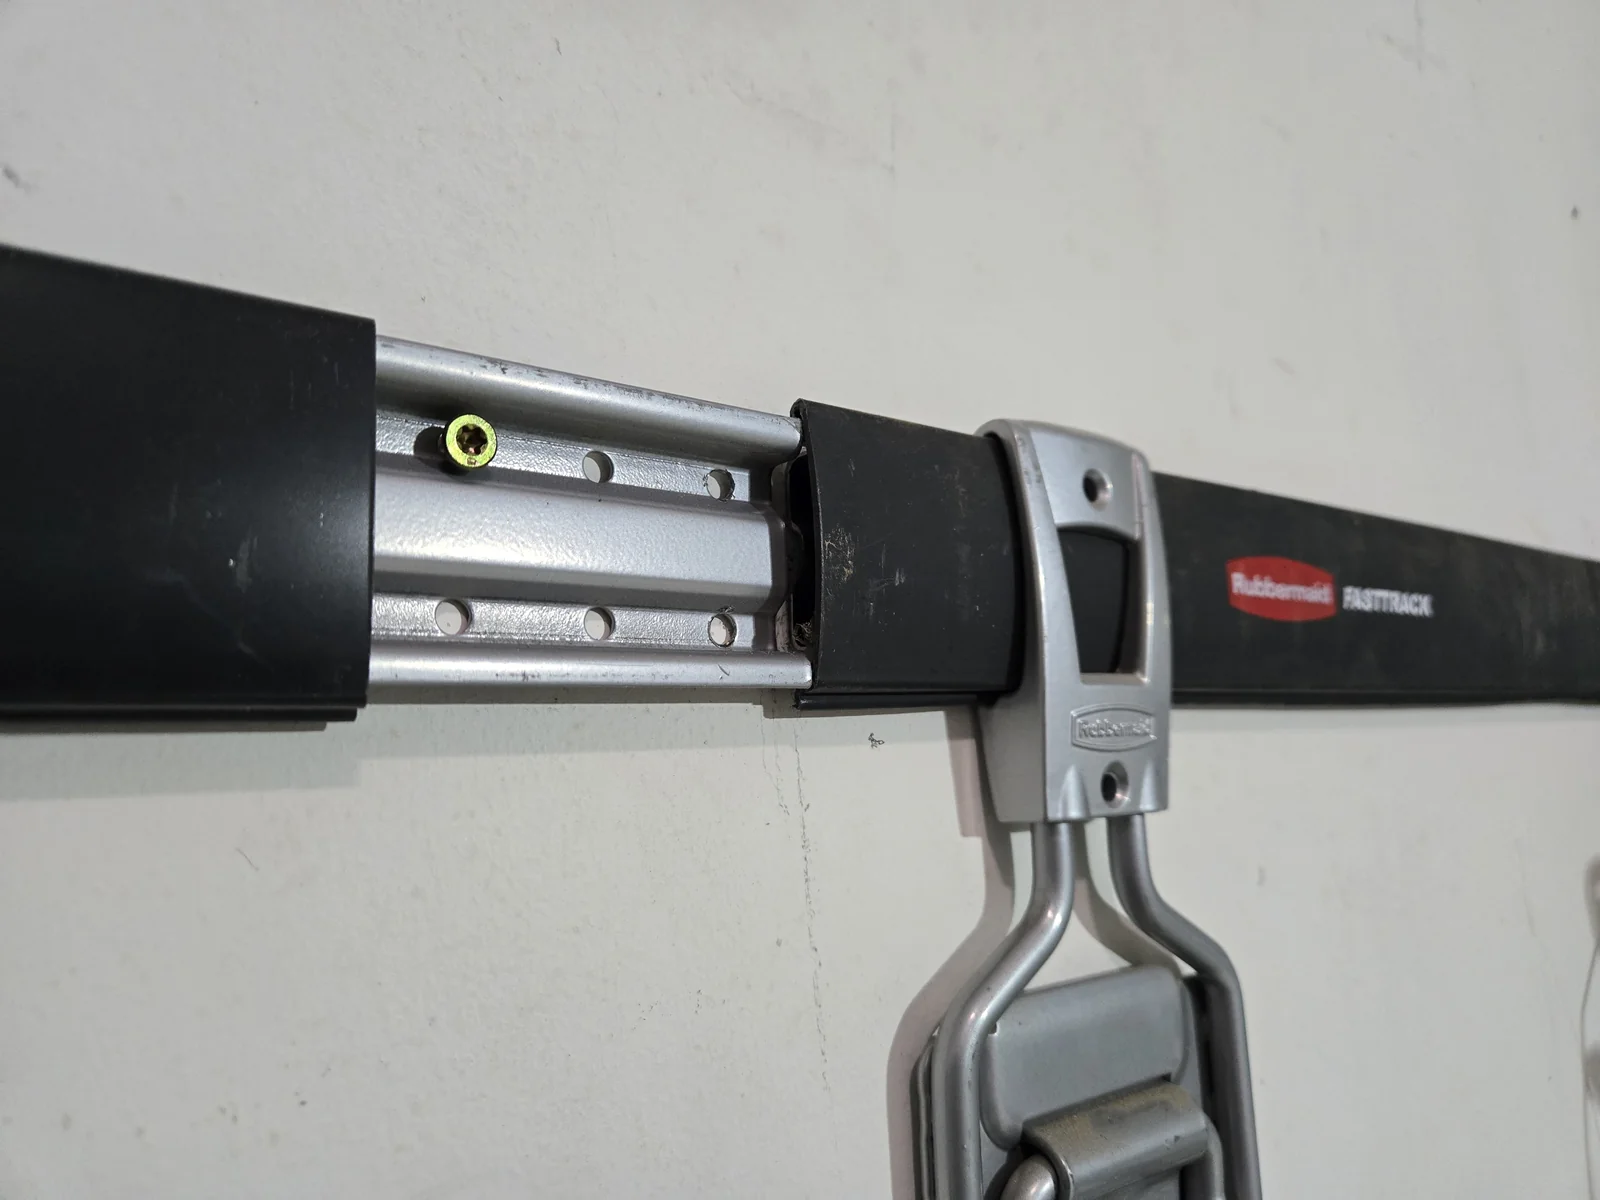
The screw heads sit flush against the rail. Don’t overdrive them — once the head bottoms out and the rail pulls tight to the wall, stop. Stripping the head or splitting the stud is more damage than the extra fraction of a turn is worth.
Step 7: Verify Level and Add Accessories
Step back and look at the rail across its full length. If the laser line still crosses the top edge cleanly, you’re done with the structural part. Now you can slide hooks onto the rail and start hanging things.
The rail is rated for 1,750 pounds per 84-inch section when fully screwed into studs. I have ladders, extension cords, lawn tools, and a bike on mine — nowhere near the limit. The thing is overbuilt.
Mistakes I Made on My First Install
Buying lag bolts. I assumed lag bolts were the right choice for “the strongest mount possible.” They didn’t fit. Bought the kit twice — once for lag bolts, then again for construction screws. Don’t repeat that.
Eyeballing the level on an 84-inch rail. My first install was just slightly tilted — maybe 1/4 inch off across the full rail. Once I loaded it up, the tools all hung at a noticeable angle and it bothered me every time I walked into the garage. Took the whole thing down and reinstalled with a laser level. Worth the upfront cost on the laser — I’ve used it for FastTrack, hanging curtains, and TV wall mounts since.
Skipping studs to “save screws.” Don’t. The 1,750 pound rating assumes every stud is screwed. Skip three studs and you’ve cut the load capacity in half. Construction screws are cheap. Use one in every stud the rail crosses.
Not planning around the garage door tracks. I started installing from one end of the wall and realized halfway across that I was running into the garage door track. Had to stop, drop the screws on the right side, and shift the rail left. Walk the wall first.
Product Comparison
| Product | Price | Rating | What It’s For |
|---|---|---|---|
| Rubbermaid FastTrack 84” Rail | $32 | 4.8/5 | The rail itself — buy one per 84” of wall |
| Grip-Rite #9 x 2-1/2” Construction Screws | $10 | 4.9/5 | The fastener that actually fits — lag bolts don’t |
| DEWALT 3-Way Green Laser Level | $499 | 4.6/5 | Pays off across multiple projects |
| DEWALT Laser Tripod | $45 | 4.4/5 | Required for setting laser at the right height |
| FastTrack Utility Hook | $5 | 4.7/5 | The most-used accessory — buy several |
Frequently Asked Questions
What screws do I use to install Rubbermaid FastTrack?
Use #9 or #10 construction wood screws that are 2-1/2 to 3 inches long, driven directly into wall studs. Lag bolts are too thick for the FastTrack rail’s mounting holes. Construction screws like Grip-Rite #9 x 2-1/2” with a T-25 star drive are sized correctly and have the holding power you need.
Do I need to hit a stud for every screw on FastTrack?
Yes. Every rail needs to be screwed into wall studs to support the load. Drywall anchors won’t work. The FastTrack is rated for 1,750 pounds per 84-inch rail because it relies on the structural strength of the studs behind the drywall.
How high should I mount the FastTrack rail?
Mount the rail at a height where your tallest stored item still has clearance to the ceiling. For most garages, that means the top of the rail sits between 72 and 80 inches off the ground. Use a laser level to mark a perfectly level line — eyeballing it never works on an 84-inch span.
How many screws do I need per FastTrack rail?
An 84-inch rail at standard 16-inch stud spacing crosses 5 studs. Drive a screw into every stud — that’s how it gets to its 1,750-pound load rating. Skipping studs significantly reduces capacity.
Can I install FastTrack on metal studs or in a garage with concrete walls?
Yes, but the fastener changes. For metal studs, use self-tapping metal screws sized for 20-gauge or 25-gauge studs (whatever your studs are). For concrete or cinder block walls, use concrete sleeve anchors or wedge anchors rated for the load you’re hanging. The wood-screw approach in this guide assumes standard wood-stud framing, which is what most US garages have.
Bottom Line
- Use construction screws, not lag bolts. Lag bolts won’t fit through the FastTrack rail’s holes. #9 x 2-1/2” construction screws are the right choice.
- Hit every stud the rail crosses. Five studs per 84-inch rail. Skipping studs cuts your load capacity dramatically.
- Use a laser level. A long rail magnifies any tilt error. The DEWALT 3-way laser is overkill if you only do this once, but pays off across home projects.
- Plan around obstacles before you start. Garage door tracks, outlets, light switches, pipes. Walk the wall first.
If you’re starting a garage organization project from scratch, my garage wall storage guide covers why I chose FastTrack over the alternatives. And if you’re hanging anything heavier than a rail — like a TV — the lag bolt write-up in my drywall anchors guide is what you want.
Products Mentioned in This Article
Rubbermaid FastTrack Garage Storage Rail (84-Inch)
Rubbermaid's flagship garage wall storage rail. Each 84-inch rail holds up to 1,750 pounds when mounted to studs — proven across 7 years of daily use in two of my houses.
- 1,750 lb load rating per rail when properly mounted to studs
- Hole spacing matches standard 16-inch stud spacing
- Hooks and accessories slide along the rail and click into place
- 7+ years of use in my garage with zero failures
- Hooks and accessories sold separately (cost adds up)
- Indoor garage use only — not for outdoor or wet environments
- Mounting hardware in the box is generic; I prefer my own construction screws
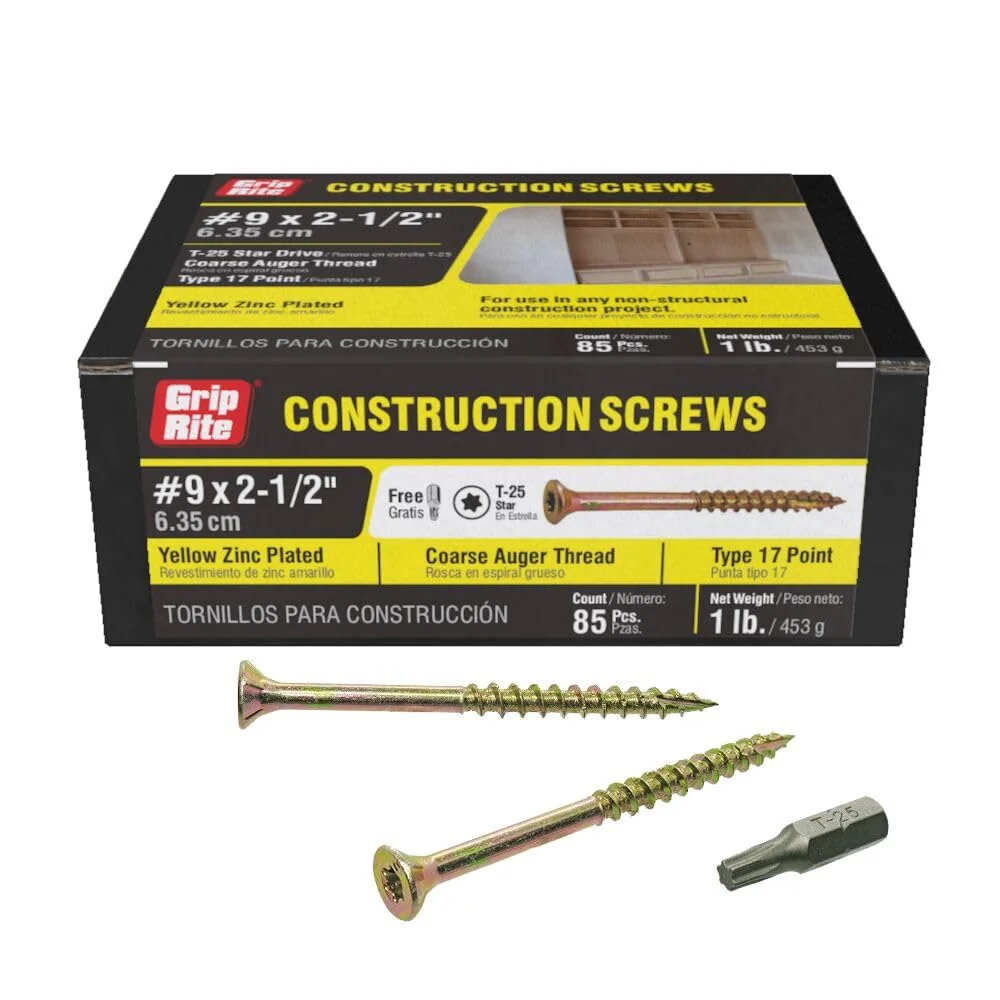
Grip-Rite #9 x 2-1/2" T-25 Star Drive Construction Screws (1 lb)
1-pound box of #9 x 2-1/2 inch construction wood screws with T-25 star drive heads. Sized correctly for FastTrack's mounting holes — lag bolts won't fit.
- T-25 star drive engages cleanly with no cam-out
- Self-starting Type 17 point — no pre-drilling needed in studs
- Coarse threads bite into 2x4 lumber and hold under heavy load
- Sized to fit through FastTrack's mounting holes (lag bolts are too large)
- Single size in the box (you may need a different length for thick siding)
- Star drive bit not included — buy a T-25 bit if you don't have one
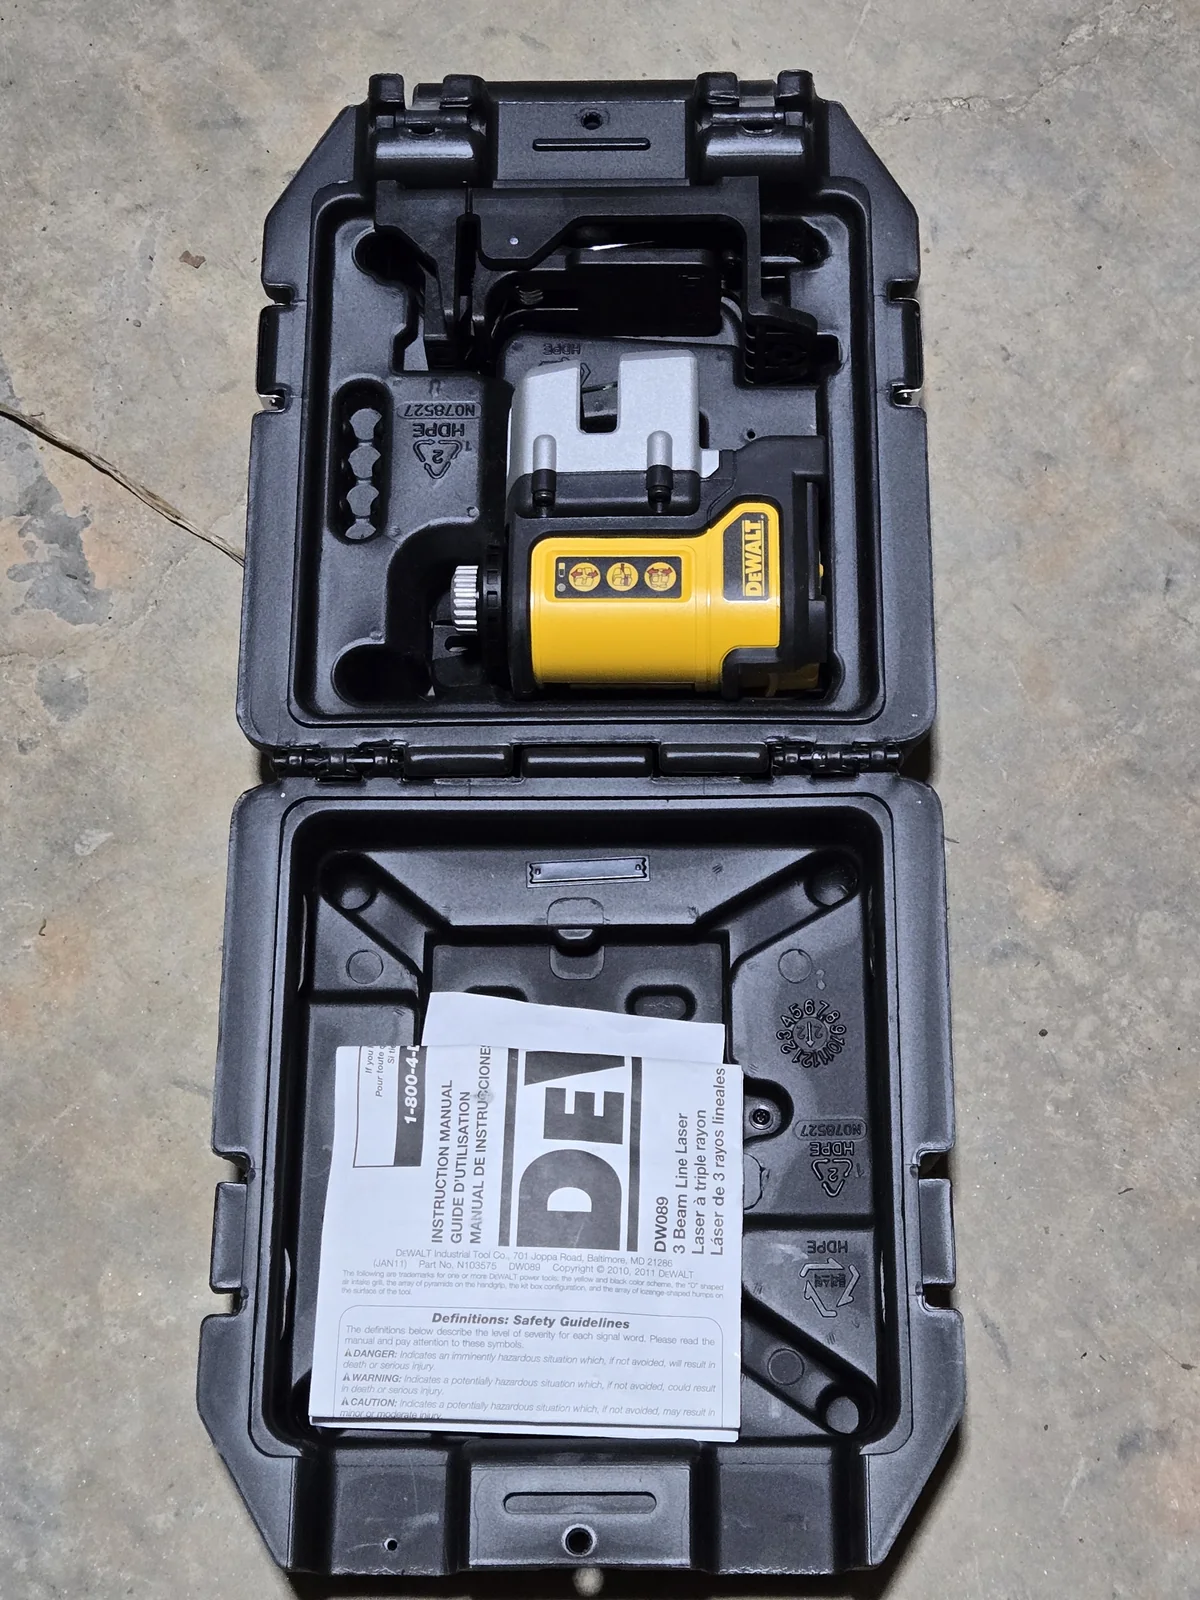
DEWALT 12V MAX 3-Way Green Self-Leveling Laser Level (DW089LG)
12V MAX 3-way green self-leveling laser level. 100-foot range with IP65 dust/water resistance, magnetic bracket, and tripod mount.
- Green beam is dramatically more visible than red in a lit garage
- Self-leveling within ±4° — set it down, it levels itself
- Magnetic mount sticks to anything ferrous; tripod mount for everything else
- Pays for itself across multiple projects (I used it for FastTrack and curtain rods)
- Expensive — $499 is overkill if you only do one project
- Battery and charger required (sold with kit)
DEWALT Laser Level Tripod (DW0881T)
DEWALT laser level tripod with 1/4 x 20 thread mount, collapsible legs, and tilting head with integrated bubble level.
- Lightweight aluminum construction packs down small
- Tilting head lets you angle the laser without re-leveling
- Integrated bubble level for quick setup checks
- Standard 1/4 x 20 thread fits other laser brands too
- Aluminum legs flex slightly at full extension
- Carrying pouch is thin